
DIY Kids desk
- Juli

- Aug 12, 2020
- 4 min read
Updated: Aug 26, 2020
If you've been following along on the School Room/Office progress then you've seen a few posts now (here and here) about these adorable desks I made The full size version is pretty straight forward but I decided to cut down 3 of the cabinets to make the little kid version and it turned out exactly how I'd hoped! Here's how!
Look how cute... (if I do say so myself)!

The Supplies
The space I was working with was 10' wide on the kids' side and 8' usable space on my side (because the door opens there) and I wanted to use ALL of it. So I used 3 cabinets + a 10' butcher block on the side for the kids, and 2 cabinets + an 8' butcher block on the "grown up" side. In terms of stain, I LOVE the look of this natural wood so really I just wanted to seal with something clear. The sealant listed below was recommended.
Butcher Block Stain/sealant (not completed yet at the time of the photos)
Table Saw
Drill
Screwdriver
Mallet
The Process
So I unboxed the Alex drawers and, thankfully after having put 2 of them together already, now felt like I had a decent grasp on what went where etc. (You know those infamous IKEA directions with pictures only. humph). Also, since I had two full sized units already assembled, it was easy to measure exactly how tall I wanted them to be and where that would land on the drawers. Obviously you don't want to cut smack in the middle of where a drawer should go. We have a cute little kids table from the previous playroom that I was able to measure for height to see how the kid chairs would fit. It was right at about 20" high so I decided something close to that would be ideal.

I needed to account for the butcher block that is 1.5" thick as well as the upper "top" and "bottom" to the drawers that is another 5/8" thick. Technically I didn't have to add this top piece as the butcher block would serve as my top in the end, but I liked the finished look that it gave on the full sized units to decided I wanted to stay consistent.

So I went with a 17 3/4" cut on the 2 side and 1 back boards bc that would give me exactly three full sized drawers. (So I essentially cut off the top 2 small upper ones).

The inside of the side panels have the drawer hardware already on them, so I had to make sure that I would clear the metal, which I did.


Once I made my marks, and set the table saw, running the boards through was easy peasy since I wasn't having to change the guard. 3 drawer units x 3 panels per unit = 9 cuts. The tops and bottoms would stay the same.


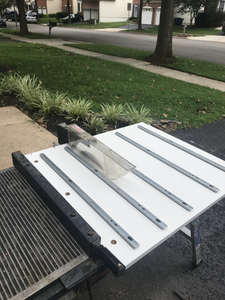
I then put together the bottom 3 drawers (aka the larger ones) for all of the units and set them aside. I separated the parts for the smaller drawers and also set them aside to save.
Then it was time to see if this thing was gonna work. I used the regular instructions for everything except the very top piece.


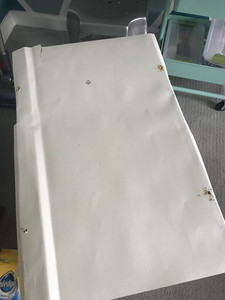
When it was time to add the top piece, I just added some dowel holes into the cut wood sides so that the dowels from the top would have a way to stay put. (I toyed with adding an L bracket but the screws were going to poke through so instead of bothering to go out and get suppppper small screws, I Just went with it since I knew the butcher block would sit on top.) I created a template for the holes with one of the many handy pieces of paper that came in the packaging to separate the panels. Since it was cut to size, I didn't have to do anything extra to make that work.


The top tapped right into place with a mallet (not sure how I missed that photo op)! Then I spaced units just under 10' apart (outside to outside) so that I would have a slight overhang with the butcher block, and placed the 3rd unit exactly center. Be careful! That butcher block is CRAZY heavy, so I definitely needed Andy's muscles to help me bring it in. In the past I have mounted the table top by screwing up through the inside of the drawers partially into the butcher block to affix the butcher block to their bases. If your children are kinda wild and the types to push, lean, climb etc... you should probably not skip that step! Also, make sure your screw isn’t so long that it pokes out the top of the table. That would kinda ruin things. You just want it long enough to go in about 1/4-1/2 of the thickness. Mine is so big it's not going anywhere and my kids aren’t really the crazy climby types~ but it’s still a wise move. I haven't stained the top yet but I'll add a clear coat here shortly. I didn't want to change the color as I LOVE how these turned out! Better to seal though with all the wear and tear that they will see! You could also "condition" with oil instead, but since I'm not food prepping on these and would rather not have to repeat the conditioning process semi-regularly, I decided to go with sealing with a clear coat.
Note: I saved the extra drawer pieces, all the cuts that I made, and bagged up the extra hardware needed so that in the future when the boys get a LOT taller, I can actually get creative and reattach them. Imagining 14 year olds with their gangly legs sitting here at this shorty desk makes me chuckle, so this would bring the height back to a standard desk. Longevity people. Gotta think ahead! Gimme some years and we'll do a tutorial on that, but for now please let me just enjoy these LITTLE kiddos! I know it won't last long.
The Result
Ok well maybe not the final FINAL result.. I can't wait to style this little thing, but you get the idea!


Want to make the shelves? See how here!
Want to see more of what I do around these parts? Be sure to subscribe!


Comments